100 Board Game Storage Ideas for Small Spaces and Growing Collections
The game you want is at the bottom of a stack. Its expansion is in another room. The cards fit neatly until you sleeve them. And the empty box has nowhere to go once play begins.
Board game storage works best when it solves these everyday problems. A better shelf arrangement can make games easier to reach. A few player kits can simplify setup. A small collection beside the table can keep your living room ready for game night without turning it into a warehouse.
These 100 ideas cover everything from full game boxes to cards, miniatures, accessories, and unfinished sessions. Some work with furniture you already own; others involve dedicated storage. Choose the ideas that match your collection and the way you play.
You do not need 100 storage products. Start with the problem that annoys you most. If finding a game is difficult, focus on shelves and labels. If setup takes too long, start inside the box. If your room serves several purposes, focus on furniture and a clear place to put everything away.
| If your main problem is... | Start here |
|---|---|
| Moving several boxes to reach one game | Ideas 1–10: shelves and game-box access |
| Running out of room in a shared space | Ideas 11–20: small-space storage |
| Oversized games and scattered expansions | Ideas 21–30: large boxes and expansions |
| Sorting piles of pieces before every session | Ideas 31–40: storage inside the box |
| Cards, miniatures, and accessories taking over | Ideas 41–70: specialized storage |
| No place for things during or between sessions | Ideas 71–90: furniture and active-game storage |
Browse the 100 Storage Ideas
1–10: Make Game Boxes Easier to See and Reach
Start with the furniture that holds most of your collection. The aim is to browse and retrieve games without dismantling the surrounding arrangement.
-
Give frequently played games individual shelf spaces. Separate positions let you take out a favorite without lifting the games stacked above it. Start with your regular rotation.

-
Arrange shelf heights around box sizes. On adjustable shelving, group similarly tall boxes and set the spacing accordingly instead of leaving every shelf identical.

-
Turn one cube into several horizontal slots. Compatible shelf inserts can divide a deep stack into separately accessible spaces while keeping your existing cabinet.

- Create a slim-box section. Put thin game boxes together in a shallow shelf space so they do not disappear beneath large, heavy boxes.
-
Use file-style holders for suitable small games. Compact boxed games can stand in a labeled holder, making titles easier to browse within a larger shelf compartment.

-
Give oversized boxes a dedicated bay. A separate space prevents one unusually large game from dictating the arrangement of every standard-size box.

- Display one favorite box facing forward. A small feature area turns box art into part of the room. Keep the rest of the shelf arranged for convenient access.
-
Add a pull-out container for small boxed games. A shallow bin lets you bring a group of small titles into view instead of reaching behind larger games.

-
Use upright storage for games with secure contents. It can make titles easy to browse, provided the insert or internal containers keep pieces contained when the box is turned.

- Keep games with loose inserts flat. For boxes whose components shift when tilted, horizontal shelf positions preserve the internal arrangement.
A relevant BoxKing option: BoxThrone shelving is worth exploring when individual game access and an expandable collection layout are priorities. Match the shelf configuration to your actual boxes.
11–20: Fit Board Games into Small and Shared Spaces
A collection does not need its own room. These ideas give games a defined home in apartments, living rooms, and dining areas.
- Use a narrow vertical storage tower. A tower can concentrate several games in a defined area when a broad wall of shelving would dominate the room.
-
Dedicate part of a dining-room sideboard to games. Games stay near their usual playing surface while the cabinet continues to serve the rest of the room.

-
Turn a suitable closet into a game library. Add labeled shelves or bins inside a dry indoor closet, giving the collection a home that can disappear behind doors.

- Use shallow under-bed containers. These can hold occasional favorites when wall space is limited. Choose containers that keep boxes supported and easy to retrieve.
-
Store a small game selection in an ottoman. An existing storage ottoman can hold compact games near the sofa without adding another piece of furniture.

- Reserve a section of the media console. Group a few accessible games beside the household's other entertainment rather than scattering them through different rooms.
- Use a drawer for pocket-size games. Dividers keep small boxes upright and visible, preventing the drawer from becoming a mixed pile.
-
Hang lightweight card games inside a closet door. A suitable pocket organizer creates separate homes for small decks and lightweight accessories.
- Create a rotating living-room collection. Keep a handful of current favorites near the playing area and store the rest elsewhere. Swap titles when your interests change.
-
Use a portable game-night caddy. A handled container can carry the evening's small games and shared accessories from storage to a dining or coffee table.
For a vertical arrangement: explore GamePillar as a way to concentrate game storage. Leave room around the chosen position to use the storage openings.
21–30: Organize Big Boxes and Expansions
A collection becomes harder to manage when one game occupies several boxes. Give related items a clear relationship instead of simply filling the next available gap.
-
Keep a base game and its expansions in one shelf zone. The boxes can remain separate while still being easy to gather for a session.
- Combine an expansion with the base game when it fits properly. Use labeled internal groups so the extra components do not become mixed into every session.
- Give separately stored expansions matching labels. Put the base-game title on each expansion container so related material remains recognizable after reboxing.
-
Create a campaign-game station. Keep the main box, scenario material, character storage, and campaign records together in a dedicated area.
-
Store heavy campaign boxes on suitable lower shelves. This avoids repeatedly lifting substantial boxes from overhead and makes a dedicated campaign area easier to use.

- Use a long compartment for unusually shaped boxes. Long boards and oversized packaging often need a different space from the standard square boxes beside them.
- Give each expansion its own component container. A removable expansion kit lets you add only the content needed for the game you are about to play.
- Keep alternate components in a labeled reserve box. Replacement pieces or unused variants need a clear identity, even when they do not belong in the active setup.
- Separate retained empty packaging from playable games. Keep collectible or protective packaging in another suitable location so it does not occupy the easiest-to-reach game spaces.
- Add an inventory card to multi-box games. List which components live in each box. You can gather the correct material without opening every container.
31–40: Make Storage Inside the Box Useful at the Table
A shelf solves where the game lives. Internal organization determines what happens after you open it.
- Pack a complete starting kit for each player. Put starting tokens, personal pieces, and reference materials together so each person can take one kit.
- Use removable trays for shared resources. Store tokens in containers that can sit directly on the table, avoiding a separate sorting step.
- Bag pieces by setup task. Group components used together during preparation rather than sorting everything only by material or shape.
- Keep scenario-specific pieces in separate packets. Label each packet clearly so unused content stays in the box. Preserve spoiler boundaries where the game requires them.
-
Use a divided organizer for numerous small components. Separate compartments can make similar tokens easier to identify and return after play.

- Store first-use components near the top. Place setup references and starting materials where they are accessible before the rest of the box is unpacked.
- Add a packing-layout photo. A photo of the organized box can help everyone return trays, boards, and bags to their intended positions.
-
Keep odd-shaped pieces in their own pouch. Separate unusually shaped pieces from loose tokens so they do not snag or disappear among smaller components.

- Choose an insert around your actual collection. Where available, select one designed for your edition, sleeves, and expansions rather than the base game alone.
- Put the rules and player aids together. A dedicated sleeve or compartment keeps reference material easy to locate without digging through component bags.
41–50: Store Cards, Decks, and Small Card Games
Card storage works best when decks retain their identity. Separate ready-to-play material from cards kept for collecting or building future decks.
- Give each ready-to-play deck its own deck box. Add the deck name or game title so it can be selected without opening several identical containers.
-
Use row-style boxes for large card collections. Dividers create browsable groups within a larger storage box and keep related cards together.

-
Separate card types with labeled dividers. Sort by whichever categories support your play: faction, expansion, encounter type, or deck-building function.
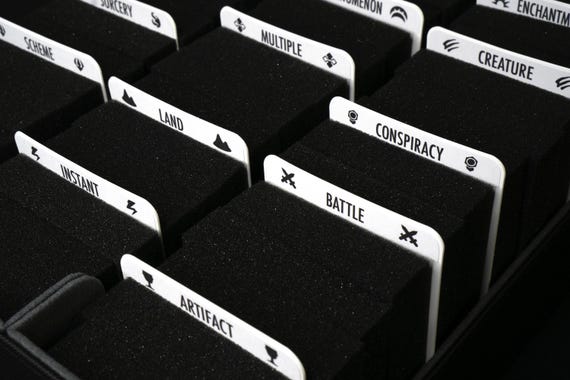
- Keep frequently rebuilt decks in a project box. Store the current deck and cards being considered together, apart from the rest of the collection.
-
Use binders for cards you browse visually. Collection pages are useful when artwork and individual card identification matter more than grabbing an entire deck.

-
Store oversized cards separately. A suitable compartment or box prevents larger cards from being forced into standard card storage.

- File spare sleeves by size. Labeled packets or divided bins make it easier to find the right replacement without opening every package.
- Keep promo cards with their associated game. A labeled sleeve inside the box helps prevent optional cards from becoming an unidentified pile.
- Pair each deck with its required accessories. Put the relevant tokens and counters in a small adjoining compartment or pouch.
-
Create a small-card-game library box. Use separate labeled compartments for compact games that suit reboxing, retaining their rules and necessary identifiers.
51–60: Give Miniatures and Terrain Their Own Storage
Boxed miniatures, painted figures, and terrain require different arrangements. Decide which pieces stay packed for play and which belong on display.
- Keep useful molded miniature trays. Original trays often provide designated positions that make it easier to identify missing pieces and pack the game again.
- Use fitted foam for delicate figures. Suitable compartments can keep figures separated; avoid compressing projecting weapons or fragile details.
- Use magnetic trays for suitably magnetized bases. A compatible tray system can hold figures by their bases instead of pressing against painted surfaces.
- Separate miniatures by faction or encounter group. Labeled trays let you retrieve the group required for a session without searching the whole collection.
- Move selected painted figures into an enclosed display. A display cabinet or case can separate showcase pieces from the boxes used for regular play.
- Add risers within a suitable display space. Staggered levels can make smaller figures visible behind the front row without spreading the display sideways.
- Store terrain tiles in flat, divided groups. Organize by size or environment so you can assemble a battlefield without emptying a mixed container.
- Give tall terrain its own compartment. Buildings and other large pieces benefit from a storage space that does not require smaller objects to rest on them.
- Create a painting-project tray. Keep the figures currently being worked on together, separate from completed models and general game components.
- Label miniature trays on the outside. Include the game or faction name and, where helpful, a simple contents photo for quicker identification.
61–70: Organize Dice, Playmats, and Shared Accessories
Shared accessories need permanent homes too. Otherwise, they tend to collect wherever the last game ended.
-
Keep shared dice in a divided container. Separate types or sets so players can find what they need without tipping everything onto the table.

-
Create one game-night essentials box. Group pencils, erasers, score pads, and other regularly used supplies in a container that travels to the table.

-
Store playmats in suitable tubes. Label the outside by game or size and follow the mat's storage guidance when deciding how to roll it.

-
Give playmat tubes a dedicated rack or bin. A defined location prevents tubes from rolling behind furniture or becoming mixed with unrelated household items.

- Use flat storage for mats that should remain flat. A suitable shallow drawer or supported shelf keeps these mats separate from rolled accessories.
-
Collect removable table accessories in one bin. Give compatible holders and trays a place to return when the table switches back to everyday use.

-
Use drawer dividers for generic tokens and counters. Separate shared accessories from components belonging to specific games.

- Keep reusable score sheets in a folder. Group them by game and store the writing supplies nearby.
-
Create a dedicated home for table toppers. Use a storage solution intended for the relevant panels, rather than improvising a pile in the walking area.

-
File loose reference sheets by game. Labeled document sleeves keep player aids, printed rules, and campaign sheets together and easy to return.

71–80: Build Storage into the Furniture You Use
Choose furniture according to the role it needs to perform: displaying a library, hiding a small collection, or bringing supplies closer to play.
-
Build a modular game library. Start with the storage your collection needs now and use compatible additions when you need more capacity.

- Combine open shelves with closed storage. Display regularly played games while using closed compartments for less attractive accessory containers.
- Use a low cabinet beside the playing area. It can provide nearby storage while keeping the upper wall available for art or other room features.
-
Use a coffee table with a storage shelf or drawer. Keep a small selection of games close to the sofa without making the tabletop their permanent home.

-
Choose a storage bench for an appropriate mix of items. A bench can combine seating with storage for suitable games or accessories, depending on its internal arrangement.

- Give a suitable side table a game-night role. Use its drawer or lower shelf for supplies, leaving the main game surface available for play.
- Use a utility cart for light game-night supplies. Trays, pencils, and small games can travel together between storage and the playing area.
- Choose dedicated mobile storage for boxed collections. When you need to move the games themselves, use a rack designed for the load and give it a defined parking position.
- Create a home for travel-ready game bags. A shelf near your usual departure point can hold a packed bag for game groups, visits, or weekend trips.
-
Use a double-sided shelving arrangement where appropriate. Accessible storage can help define a play area within a larger room when the furniture is designed for that placement.
Match the furniture to the role: BoxKing's storage systems include options for different collection layouts. Choose around the boxes you own and how you access them, rather than adding the same type of furniture to every part of the room.
81–90: Store Games Between Turns and Between Sessions
Storage is also part of playing. Empty boxes, ongoing campaigns, and partially completed sessions need somewhere to go.
- Assign a temporary home for the empty game box. A nearby shelf or designated container keeps it available for cleanup without leaving it on a chair or the floor.
- Use a removable tray for a compact ongoing game. Where the game suits it, a tray can move the setup from the table to a supported storage location.
-
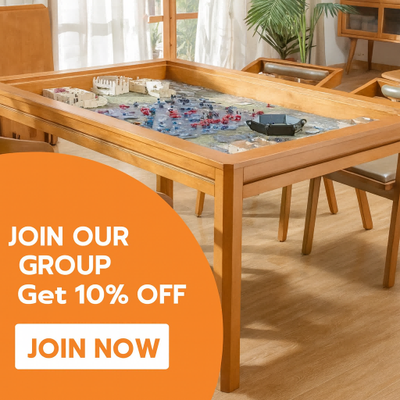
Preserve a game in a suitable recessed table. A compatible topper can allow another use of the surface, provided the stored game fits within the covered space.

- Make a labeled save bag for each player. Keep personal cards, resources, and character pieces together between campaign sessions.
- Use a session box for the next scenario. Prepare the relevant pieces in one container while keeping unused campaign material in its main storage.
- Keep session notes with the saved game. A short record of progress and a setup photo can help restore a game that cannot remain assembled.
- Give each ongoing campaign its own shelf zone. Keep its active boxes and records together so multiple campaigns do not become mixed.
- Prepare a guest-night selection basket. Gather a few likely games before visitors arrive, then return them to their normal places afterward.
- Pack recurring group supplies together. A shared kit for your regular group can hold pencils, generic dice, and other accessories used across sessions.
- Create a temporary returns tray. Use it for items awaiting sorting after play, then empty it before the next session so it does not become permanent clutter.
91–100: Make Games Easy to Find and Put Away
A storage system lasts when its arrangement makes sense to the people using it. Labels and simple groupings help a collection stay usable as it changes.
- Arrange a large collection alphabetically. This gives people a predictable way to find a specific title without remembering where it was last placed.
- Group games by player count. A two-player section or larger-group section can make choosing a game easier when attendance is already known.
- Group games by session length. Separate shorter games from longer commitments so the available time helps guide the choice.
- Use game-night categories. Family favorites, cooperative games, and strategy games can form intuitive sections for your household.
- Label shelf locations. Simple location codes help identify where separately stored expansions or accessories belong.
- Keep a basic collection inventory. Record titles, expansions, and storage locations when the collection becomes too large to track comfortably from memory.
- Use picture labels for a family game area. Small box-art images can help younger players match games to their storage positions.
- Give borrowed games a separate location. Keep them distinct from your own collection and attach a reminder of who they belong to.
- Create a small incoming-games area. Use it to sort new games and components before assigning permanent homes, rather than scattering arrivals across the room.
- Reserve a space for games leaving the collection. Titles awaiting sale, donation, or return can stay organized without blocking access to the games you intend to keep playing.
Choose a Storage Combination That Fits Your Game Nights
The most useful setup is often a combination of a few ideas. A small apartment might use a sideboard for the main collection, a basket for current favorites, and player kits inside each box. A larger collection might use individually accessible shelves, a separate campaign area, and a cart for shared supplies.
You can also improve storage in stages. First make the games easier to find. Then address awkward boxes and scattered components. Add furniture when your existing arrangement can no longer provide the space or access you need.
If dedicated furniture is the next step, explore BoxKing board game storage solutions and compare them against the role you want them to fill. A well-organized collection should be easy to browse, easy to bring to the table, and easy to put away afterward.