3d Printing for Board Games: Two Hobbies that Each Make the Other More Fun

When you love a board game, sometimes you want to add something to make it prettier and more fun, besides just buying available upgrades. 3D printing has become a way for me to do that, while itself turning into a fun and interesting hobby.
I’ve been playing board games for more than half a century, and I’ve been immersed in the modern board game hobby for the past ten years. I’ve been keeping an eye on 3d printing technology since about 2010. I had always been fascinated by it, but for a long time thought, “That’s really cool, but I don’t know what I would ever really do with it.” It turns out there is a lot of cool stuff I can do with it, but first I’ll take you through my journey of learning how this all works.
Table of Contents
- The First Printer: Choosing FDM Over Resin
- Printer Assembly and Learning Process
- The Workflow: From Model to Finished Object
- Additional Costs, Accessories, and Printer Setup
- Problems with Printing: Clogs, Blobs, and Maintenance
- Printing Custom Components: Inserts, Tokens, and Upgrades
- Designing Custom Inserts and Upgrades for Games
- Printing Upgraded Components and Gameplay Aids
- Travel-Friendly Versions and Future Printer Considerations
- Conclusion: The Fun and Rewards of 3D Printing for Board Games
The First Printer: Choosing FDM Over Resin
In late 2022 I started to think about how I could use a 3d printer to upgrade my board games, and that became my excuse to dive in. With great excitement I bought my first printer in early 2023. I researched the various options to figure out what was right for me. My first decision was to get an FDM (Fused Deposition Modeling) or filament printer, rather than a resin printer. An FDM printer builds objects by depositing bits of melted filament layer by layer to build up an object. Resin printers shine light into a tank of resin to solidify a 3d object. Resin printers can achieve higher resolution and are suitable for printing miniature figures with fine detail, but they are messy, create dangerous fumes, and require post-processing to clean and cure the model. At the time I was shopping for my first printer, it looked like Prusa made the highest quality consumer machines, but they were a little more expensive than I was ready for (over $1,000* at the time, including shipping for the model I would want). Instead, I chose the Sovol SV06, a Chinese printer that was similar but not as high quality, for a much lower price (about $250).
Printer Assembly and Learning Process
I had to assemble the printer when it arrived, which was not difficult. The instructions were clear, and it took maybe an hour. I was able to print my first test object quickly and felt like things were going well. I soon discovered that 3d printing is slow – simple little objects take half an hour or an hour to print, and more complex things, like an insert for a large game, can take more than a day, sometimes including many separate parts printed one after the other. After a few months I decided to buy a second, larger, faster printer: the Sovol SV06+. Together these increase my throughput and allow me to print multiple objects in parallel.

The Workflow: From Model to Finished Object
At first the process to print an object consisted of these steps:
- Find the 3d model on the internet and download it. There are many sites where you can find models, mostly for free. I have rarely found it necessary to learn how to create my own object. 3d models are generally saved in .stl files.
- Bring the model into the slicer, a program that converts the 3d geometry into detailed instructions for the printer. The slicer lets you arrange multiple objects spatially on the build plate (translate, rotate and scale as desired), and control various parameters affecting the quality of the print. The output of the slicer is a .gcode file with detailed instructions for a specific brand and model of 3d printer, telling it how to move the print head and deposit filament to progressively build the object. The .gcode file is saved out to an SD card.
- Take the SD card to the 3d Printer and insert it into its card reader. Then tell the printer to print that file. You can also connect the printer to your computer with a USB cable and send the file directly.
Additional Costs, Accessories, and Printer Setup
I had not fully understood all the other expenses that come with buying a 3d printer. First is the filament, at $15 to $20 per 1 kg spool. If you want to print a lot of different things for many games, you’ll need lots of colours. I currently have close to 30 different spools of filament in my workshop, and multiple spools of the colours I use the most. The printer came with a handful of small tools needed to support its operation: small snips to cut filament, a thin tool to pry objects off the build plate, a set of little hex wrenches to assemble the printer and replace parts when needed. Spoiler alert: you will need to! Over time I added accessories such as rulers, brushes, lights, glue, and a lot more. I ended up installing a pegboard above my worktable with everything I need arranged neatly.

- Above each printer is a fire extinguishing ball. In the event of flames reaching the ball, it will explode with fire-supressing powder to put out the fire.
- Above each printer is a smoke detector switch, and each printer is plugged into that switch. The smoke detector will shut off power to the printer if smoke is detected.
Problems with Printing: Clogs, Blobs, and Maintenance
While I thankfully have not had a fire break out, I have had more than my share of problems with these printers. 3d printing is not a set-it-and-forget-it kind of process, though it is getting closer to that with some of the newer printers on the market. Print nozzles get clogged, stopping anything from being printed. Printed objects occasionally slip off the build plate, resulting in the machine then printing into thin air, resulting in lots of “spaghetti” being produced, depending on how long this goes on before you come back to check on the print. The worst problem is the dreaded blob, when filament backs up in the extruder instead of being deposited on your object. A bad blob can destroy your extruder and leave your printer busted until replacement parts arrive. I have had a few bad blobs that made me replace either just the hot end (the part that holds and heats the print nozzle, about $20) or the entire extruder assembly (about $50) multiple times. It can take a few weeks for the replacement parts to arrive, so I’ve learned to keep spare parts on hand. Over time I have learned more about how to keep things under control and mostly anticipate problems before they get severe.
The first things I printed were add-ons for my 3d printers! These included:
- A small tray that attaches to the printer to hold SD cards
- Brackets to attach an LED strip light to better illuminate what I’m printing
- A bracket to attach a web cam to the printer to monitor the progress from another room
- A tool rack to hold all the tools I use with my printers
- Sample swatches for each colour of filament, to show what they look like when printed, and a box to hold the swatches
- A box to store extra print nozzles
- Small filament clips to secure the end of each spool so it doesn’t unwind and get tangled
- Hooks and shelves for the pegboards!


Printing Custom Components: Inserts, Tokens, and Upgrades
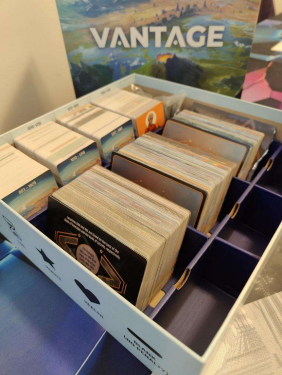
So how has this supported my board game hobby? The main use has been to print inserts for games. Some games come with very good, functional inserts, while others wind up being a pile of cards or tiles and baggies of other components. A good insert does a few important things:
- It keeps everything well-organized, so it’s easy to find what you want, and put everything away neatly and easily
- It allows you to store your game vertically, if that’s your preference (but I’m not wading into that religious war here)
- It makes setup and tear-down quicker and easier
- It supports game play by letting you arrange things on the table as you like
- It makes effective use of space, often making it possible to store expansion(s) together with the base game in one box, ideally without lid lift
Talented designers have created great inserts for many, many games, and most of them are available to download for free. The main sites to find inserts and other printable upgrades are:
- https://www.printables.com/
- https://www.thingiverse.com
- https://makerworld.com/en
- https://www.yeggi.com/
- https://boardgamegeek.com/geeklist/186909/3d-prints-for-board-games (lets you search by game – useful, but far from complete)
- http://homeskillet.org/bgg3dprints/ (enter your BoardGameGeek user id and get a list of things to print for games you own)
- https://cults3d.com/en (these are mostly paid models, with a few free ones)
Designing Custom Inserts and Upgrades for Games
I have printed inserts for more than 50 of my games so far, some simple and utilitarian, others complex combinations of many parts. I have also designed a handful of simple inserts myself, using the online tool at https://deckinabox.sgenoud.com/token-tray-fdm. I will now often print an insert for a new game before it has arrived!Here are some of the inserts I have printed for my games:


and a different shape for each type of virus (replacing the cubes that came with the game).

and the recipe book(s) that correspond to it.


Printing Upgraded Components and Gameplay Aids
Apart from inserts, I have also printed upgraded components for some games. Two good examples are Pandemic, where I replaced the virus cubes with organic virus shapes, and Cat Lady, where the generic food cubes got replaced with chicken drumsticks, tuna fish, and milk cartons.


blue and red cubes that came with the game.
I’ve made gameplay aids for several games:
- DorfRomantik : Tile frames to keep all the hex tiles from sliding around, 3d flags to make it easier to keep track of flag areas that need growing, and small circles to highlight other things we don’t want to forget about as we build the tableau.
- Card holders for the market for deck-building games (The Quest for El Dorado, Trains)
- Player screens for games like No Thanks, For Sale, to keep private info hidden.
- A cute folding dice tower for most dice games


Travel-Friendly Versions and Future Printer Considerations
I have also printed components to make small, portable versions of a few games for travel, notably Project L, Mountain Goats and Can’t Stop. I want to stress that I have bought these games (2 copies of Project L, as it’s one of our favourites and we have a second copy at the cottage!) and use the 3d-printed versions only for travel. The point of 3d printing is not to completely replace games you can buy.
There are some 3d printers that can handle multiple colours of filament at once, switching colours many times while printing to produce multi-colour models. My printer does not support that, but I am able to make multi-coloured prints in a limited way, by pausing the print and changing filament at just the right time.


The white logo was printed first, and then the filament was changed to green
to print the rest of the lid atop the white logo.
Conclusion: The Fun and Rewards of 3D Printing for Board Games
At the time I was shopping for my first 3d printer, Sovol was an excellent choice for me. It gave me good quality, decent reliability, and satisfactory performance at a low price, so the value was excellent. I was willing to go through a steep learning curve and troubleshoot problems as they arose. That might not be enjoyable for everyone, but it mostly was for me.
If I were starting over today, I would lean towards a Bambu printer, a newer brand that was not an option for me 3 years ago. They make affordable printers that, from what I have read, are easy to use and more trouble-free than what I have experienced. They also support true multi-colour printing, which the Sovol printers do not, apart from the method of stopping a print and changing filament carefully. It does not appear that Bambu printers currently support Klipper though, and they have more of a closed/proprietary approach to technology.
My 3d printing journey has been a lot of fun, and very rewarding. I’m really happy with how I’ve been able to upgrade so many of my games to enhance the experience of playing them. I’ve gotten lots of extra exercise running up and down the stairs to check on my prints, change filament and deal with the entire process, and I need more exercise! Mostly, though, it has been a great opportunity to learn new things, which is a big part of keeping my brain working and making me happy.
*all values are in US dollars


John Gross
