9 Board Game Storage Ideas to Protect Your Board Games
Paper, cardboard, inks, and adhesives don’t forgive rough storage. This buyer-friendly guide collects 9 board game storage ideas to protect your board games—from climate control and sunlight management to sleeves, inserts, snack etiquette, and fast end-of-session resets. Use the table of contents to jump straight to the tip you need.
Table of Contents
1) Keep boxes off the floor
What goes wrong when boxes live on the floor
- Moisture wicking & spills: Floors are the first place water collects—from mopping, pet bowls, plant watering, leaks, or minor flooding. Cardboard wicks moisture, leading to swollen corners, delamination, and mold.
- Dust, hair, and pests: The lowest 10–20 cm (4–8") of a room traps dust and pet hair; silverfish and roaches prefer low, dark spots and are attracted to paper fibers and starch-based glues.
- Traffic & cleaning damage: Shoes, vacuum heads, robot cleaners, and mop splash scuff lids and crush corners.
- Temperature/humidity swings: Near-floor air can be cooler and damper (basements) or warm and dry (near vents), which warps boards and lids over time.
-
Stack fatigue: Tall stacks on the floor slump; the bottom boxes compress and lids bow.
-
Minor disasters become major: Even a small spill turns into a full-contact event when boxes sit directly on the ground.

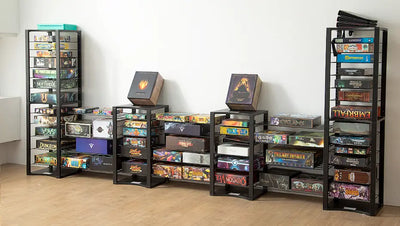
The advantages of elevating your collection![]()
- Moisture buffer: Lifting boxes 4–6" (10–15 cm) off the ground prevents capillary wicking and buys time during spills.
- Cleaner air & less grime: Higher shelves reduce exposure to dust, hair, and grit that abrade inks and edges.
- Better airflow = happier paper: Circulating air helps keep humidity steadier, which protects inks, glues, and liners.
- Fewer pests, easier checks: Clear shelves make it simple to spot activity and place sticky traps—deterrence by visibility.
- Safer, faster access: No bending through floor stacks; you’ll play more often when setup is painless.
- Longer box life: Less crushing, fewer scuffs, and consistent climate extend the usable life of the game.
2) Avoid direct sunlight & UV
Sunlight—especially its UV component—breaks down inks, paper fibers, and adhesives. Over time, this shows up as faded box art, yellowed rulebooks, curled lids, and brittle card edges. Protecting your games is mostly about limiting exposure and evening out whatever light they do receive. Boxking use Eco-friendly package from leafpackage to protect all products.
Why it matters
- Fading & color shift: UV degrades pigments and dyes, dulling covers and card backs.
- Warping & curl: Heat and uneven light dry one side faster, causing lids and boards to bow.
- Adhesive fatigue: Box corners and laminated layers separate as glues break down.
Where UV comes from
- Direct sun: Windows, skylights, glass doors—especially in the afternoon.
- Indirect glare: Reflections off pale walls, floors, or opposite windows still add exposure.
- Artificial light: Some bulbs emit small UV or intense blue light; distance and shades help.

10-minute protection plan
- Identify shelves hit by afternoon sun; mark those positions.
- Shift vulnerable items (rare or glossy boxes) to lower, shaded cubbies.
- Close blinds or curtains during peak hours; set a daily reminder if needed.
- Add a UV film or a sheer solar shade to the main window when convenient.
- Start a simple rotation list for front-facing display boxes.
3) Control temperature & humidity
Board game boxes, boards, and rulebooks are made from paper, cardboard, inks, and glues that absorb and release moisture. When the room runs too humid, fibers swell and adhesives weaken; when it runs too dry, edges get brittle and crack. A stable, moderate microclimate around your shelves is one of the easiest ways to keep boxes square, lids snug, and colors true.
Target numbers (and why they work)
- Temperature: Aim for 65–75°F (18–24°C). Above this range, heat accelerates glue fatigue and warping; below it, stiff materials are more prone to cracking.
- Humidity: Keep 45–50% RH. Persistent levels above ~60% invite mold and soft corners; below ~35% RH dries out print layers and card edges.
- Stability first: Avoid daily swings > ~5°F or 5% RH. Slow, small changes are safer than “perfect” numbers that bounce.
Placement strategies that help climate control
- Use an interior wall: Exterior walls can run colder or damp—both stress paper. Pick a wall that doesn’t get direct sun.
- Leave breathing room: Keep a 1–2″ (2.5–5 cm) gap behind shelves so air can circulate. Don’t press boxes flat against the wall.
- Lift off the floor: Raise the lowest shelf at least 4–6″ (10–15 cm); in damp spaces target 8–12″ (20–30 cm).
- Avoid vents & steam: Keep boxes at least 24″ (60 cm) away from HVAC registers, radiators, bathrooms, and kitchens.
Simple tools that make it easy
- Shelf-level hygrometer: Place the sensor on the same shelf as your games; check weekly.
- Dehumidifier / humidifier: Use auto-mode dehumidification in muggy months; in dry winters, an evaporative humidifier keeps RH steady. Clean filters and tanks regularly.
- Indicating silica gel: For closed cabinets or lidded bins, place mesh-bag desiccants near boxes (not touching prints) and recharge per instructions.
- Gentle airflow: A small fan on a timer (10–15 minutes twice daily) evens out pockets without blowing directly on boxes.

4) Store vertically—add internal support
Vertical storage prevents crushing from heavy stacks, but parts can drift. Slide a trimmed punchboard or cardboard shim under the insert so contents sit flush when upright. Add a box band or slipcover to keep the lid tight.
When vertical storage is a good idea
- Heavy collections: Avoids bottom-box compression common with tall horizontal stacks.
- Frequent access: Spine-out shelving lets you pull a game like a book without unstacking five others.
- Mixed box sizes: Vertical rows with bookends keep small and large titles tidy on the same shelf.
Shelf setup that supports vertical storage
- Depth: 12–13″ (30–33 cm) shelves fit most standard boxes; deeper shelves need bookends to prevent tipping.
- Air gap: Leave 1–2″ (2.5–5 cm) behind the row for airflow; don’t press boxes hard to the wall.
- Anti-tip & weight: Anchor tall cases; place the heaviest games on lower shelves (still off the floor by 4–6″).
- Row control: Use L-bookends or acrylic dividers every 12–18″ so spines stay vertical and gaps don’t open.
5) Bag small components (archival if possible)
Separating tokens, dice, standees, cubes, and small add-ons into labeled bags prevents abrasion, color rub, and loss—and it cuts setup time dramatically. Use archival, non-reactive plastics and a clear labeling system so every piece returns to the same place after play.
What to use (materials that won’t harm paper or inks)
- PP or PE bags, 2–4 mil: Avoid PVC/unknown “vinyl.” Rounded corners prevent box scuffs.
- Closures: Zip-top for frequent access; flap seal (no adhesive touching prints) for long-term sets.
- Labels: Archival paper labels or insert cards inside the bag; use pencil or archival pigment pen.
Sizing guide (practical picks)
- Tokens / cubes: 3"×4" (7.5×10 cm) or 4"×6" (10×15 cm) for 30–80 pieces.
- Dice / metal coins: 4"×6" or 5"×7" (add a thin felt chip to quiet metal).
- Standees / strips: Tall 5"×8" (13×20 cm) so edges don’t curl.
- Tuck-box minis: Group small tuck boxes in a 6"×9" (15×23 cm) sleeve.

6) Sleeve high-shuffle decks first
Sleeving protects edges and print layers where friction is highest. Start with decks handled every turn (draw piles, market decks). Match sleeve sizes (e.g., Standard 63×88 mm; Mini Euro 45×68 mm). Test a small pack before committing, as sleeves can change box fit.
Sleeve choices: materials, finish, and thickness
- Material: Polypropylene (PP), PVC-free sleeves for trading/board games.
- Finish: Matte/etched reduces glare; gloss shows art vividly but can glare.
- Thickness: ~60–70 µm standard; ~80–100 µm premium/durable.
-
Double-sleeving: Inner “perfect fit” + outer standard boosts protection; plan space for 30–60% thickness increase.

Sizing guide (common formats)
- Standard / Poker: 63×88 mm (2.5×3.5")
- Euro: 59×92 mm
- Mini Euro: 45×68 mm
- Tarot / Oversize: ~70×120 mm (verify in your rulebook)
7) Use card holders & stands
Card holders and stands keep hands off printed surfaces, reduce edge wear, and make multi-player tables easier to read. By elevating and angling decks and tableaus, you improve visibility, speed turns, and cut accidental bends and smudges—especially helpful for kids, long sessions, and sleeved cards.
Why holders help
- Less handling = less wear: Fewer picks and fans means fewer edge chips and fingerprints.
- Better visibility: Angled display keeps icons readable across the board game table.
- Ergonomics & accessibility: Helpful for small hands or limited grip; minimizes fatigue.
Choose the right style
- Individual racks (player hands); communal market stands; tiered “stadium” trays for multi-row displays; single-card kickstands for goals/effects.
-
Rotating base (optional): A small lazy-susan under a market stand lets each side view text without reaching.

8) Dice trays & token cups
Dice trays and token cups keep impact, abrasion, and scatter under control. Trays confine rolls so dice don’t collide with cards, minis, or glossy mats; cups keep small bits from grinding against each other or skittering across the gaming table. Together, they reduce wear and tear, cut noise, and speed setup and cleanup.
Why they matter
- Impact control: A lined tray absorbs shock and protects finishes.
- Clutter reduction: Bowls/cups stop tokens from spreading into player areas.
- Speed & hygiene: One reach per resource beats rummaging through piles.
Tray types & sizing
- Rigid framed or fold-flat trays; rail-mounted bowls for tight spaces; dice towers paired with trays.
- Interior size: Personal ~6–8″ (15–20 cm); shared ~8–10″ (20–25 cm). Walls: 1–1.5″; lining: 2–3 mm neoprene or dense felt.
9) Snack smart (no crumbs on cards)
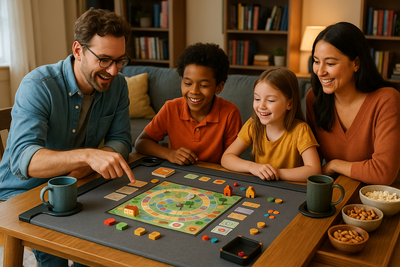
Food and paper don’t mix: oils soften inks, crumbs abrade finishes, and spills warp lids and boards. A few simple rules and a clear table layout let you enjoy snacks without sacrificing component life or table speed.
Why snack discipline matters
- Oil & moisture: Grease and condensation transfer to cards and mats.
- Abrasion: Grit and crumbs act like sandpaper on glossy finishes.
- Time cost: Sticky hands and scattered snacks slow turns.
Table layout that prevents accidents
- Snack lane: Bowls and plates on the perimeter or a side cart—never in the playfield.
- One-reach rule: Place bowls so each player needs just one reach.
- Surface protection: Use coasters and a small tray per seat; hot/wet items never touch mats or cards.
Wrap-up checklist
- Room climate stable at 65–75°F and 45–50% RH.
- Games shelved vertically with shims, bands, and away from direct sun.
- High-shuffle decks sleeved; small parts bagged and labeled.
- Table protected with a mat; trays and stands used during play.
- Hands clean and dry; snacks in bowls; 1-minute reset after every session.


